written by Frank Swygert, 04-28-2026
Torque Tube Rear Axle Swap
1956-66 Ramblers (all except American models – can also be applied to earlier Nash and Hudson torque tube cars)
Introduction
Getting rid of the torque tube is the single biggest hurdle when engine swapping a 56-66 “big” Rambler. The primary reason is that the torque tube is the locating arm for the rear axle. It’s rigidly bolted to the front of the axle with a flexible link at the transmission. The driveshaft and universal joint(s) are enclosed inside the tube. The flexible transmission link means there is a special adapter on the end of the output shaft housing to mount the tube. All of this must be replaced to swap an engine unless the trans will bolt to the new engine, which is unlikely but sometimes possible with the right combination of parts.
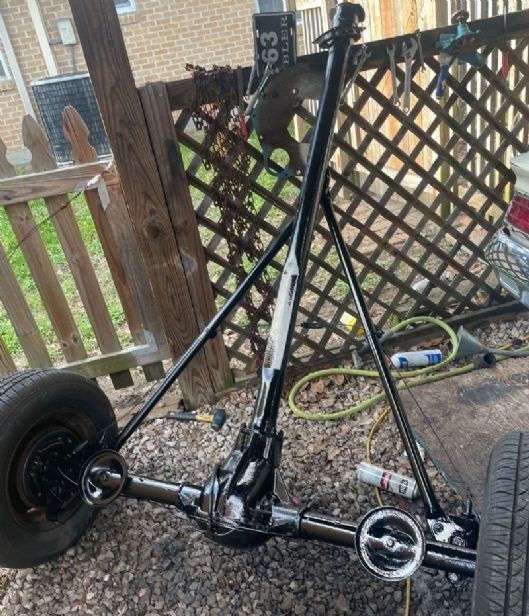
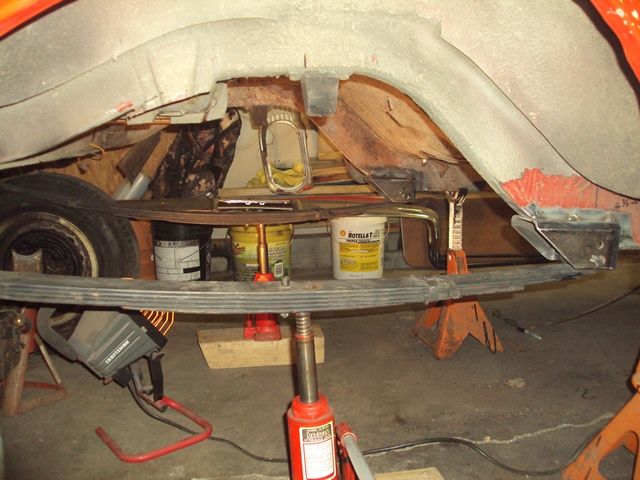
Torque tube axle assembly, 63-66 Classic, Ambassador, Marlin. Spring seats are attached with a single short 3/8″ fine thread bolt, threaded into the axle tube.
I haven’t put in a lot of details like measurements and such in the different ways to replace the rear suspension. Partly because I don’t have ready access to each car, and partly because all this has to be custom fabricated. I’ve included what parts were used when known. The photos should show enough for any experienced fabricator to replicate the installation.
What Rear Axle Fits?
Since the torque tube and rear axle are bolted together the rear axle needs to be swapped also. Axle width is the big issue here. A stock 63-66 big car rear axle is 58-1/8” to 58-1/2” from wheel mounting surface (WMS) to WMS. For stock wheels that’s the range you’re shooting for.
A bit wider rear axle can be used, but you may need deeper offset wheels to compensate. I used a 1987 Jaguar SJ-6 IRS in my 63 Classic. The Jag IRS is 61-3/4” WMS to WMS. I run a 7” wide wheel with 5-3/4” backset instead of the typical 3-1/2” or 3-3/4” to compensate rather than narrowing the axle. I run the same wheels in front with 1-1/2” spacers. Conversely, a slightly narrower axle can be used with wheel spacers making up the difference.
Bolt pattern is another consideration. AMC uses a 5 x 4.5” bolt pattern (5 lugs in a 4.5” circle) on all cars and Jeep XJ Cherokees, MJ Comanches, and 87-06 Wranglers. Most five lug Fords and Chryslers use the same bolt pattern. Toyota Tacoma two wheel drive models use the same pattern up to 2014.
The S-10 4×4 rear axle is close to the right width and often used, but it has a 5 x 4.75” bolt pattern (later Colorados use a different pattern and are too wide). That means you will have two different bolt patterns assuming you keep the AMC front suspension. I had this same issue when using the Jag IRS – it uses a 5 x 4.75” pattern also. In my case I used a dual bolt pattern wheel. You don’t have to – you can use two different pattern wheels then buy a less expensive dual pattern wheel to use as a spare. I use a narrow (4”) dual pattern wheel with a 185/80R15 tire as a “space saver” spare.
Here are the widths of some commonly used rear axles – all 5 x 4.5” bolt pattern except the Chevy S-10:
1963-1966 Rambler big car – 58.125”-58.5”
1967-1978 Rambler big car – 60” (also Pacer)
1967-1970 Ford Mustang/Fairlane — 59.25″
1971-1973 Ford Mustang/Fairlane/Torino/Ranchero — 61.25″
1969-1977 Ford Maverick 8″ — 56.5″
1974-1978 Mustang II 8″ — 57″
1977-1981 Ford Granada /Lincoln Versailles — 58″
1983-1992 Ford Ranger 7.5” and 8.8” – 56.5”
1993-2011 Ford Ranger 7.5” and 8.8” – 58.5”
1991-2003 Ford Explorer 8.8” – 59.625” (91-94 drum brakes, 95-03 discs)
1989-1997 Ford Aerostar 8.8” – 62.50”
1986-1993 Ford Mustang 8.8” – 59.25”*
1994-2004 Ford Mustang 8.8” – 61.25”*
1968-1979 GM X-body (Nova/Skylark/Omega/Ventura) — 58″
1968-1972 GM A-body (Chevelle/Monte Carlo/Tempest/LeMans/Cutlass/Skylark/ElCamino) — 62.5″
1973-1977 GM A-body (Chevelle/Malibu/LeMans/Grand Prix/Century/Regal/Cutlass) — 61.25″
1978-1988 GM A-body (Monte Carlo/Grand Prix/Cutlass/Regal) — 58″
1982-2004 Chevrolet S-10 – 2WD – 54.5”
1982-2004 Chevrolet S-10 – 4WD – 59”
1982-1992 GM F-body (Camaro/Firebird) – 61-5/8″**
1993-2002 GM F-body (Camaro/Firebird) – 64-3/4″ – 65″**
1975-1980 GM H-body (Monza/Sunbird/Skyhawk) – 54-55″**
1984-2001 Jeep XJ Cherokee/MJ Comanche Dana 35 – 59.5”
1987-1996 Jeep YJ Wrangler, Dana 35 and 44 – 60.75”
1997-2006 Jeep TJ Wrangler, Dana 35 and 44 – 60.5”
(later model Wrangler axles are over 65″ wide, CJ-7 axles a too narrow at 50.5 for 76-81 and 55″ for 82-86, plus they use a 5 x 5.5″ bolt pattern)
1976-1989 Chrysler F and M body (Aspen/Volare/Diplomat/LeBaron/5th Avenue) — 58.5″
1987-1996 Dodge Dakota/Durango – 59.5”
1979-1985 Toyota Pickup/4Runner — 55”
1986-1995.5 Toyota Pickup/4Runner – 58.5”
1995.5-2004 Toyota Tacoma – 60.75”
2005-2014 Toyota Tacoma – 65”
All used leaf spring rear suspension except where noted.
*Mustangs used a four link suspension
** These used a torque arm suspension with coils springs
Axle strength depends on your intended use and just how much power you’ll have. For most cruisers the Ford 7.5” will be sufficient even with up to 400 hp or so. Ford sites say they typically handle 300-350 hp stock. If you’re going to be drag racing or know you’re going to be banging on it hard (lots of burn-outs, etc.) you may want something like the Ford 8.8”. Personally I’d save the weight and money with the lighter axle if possible.
Locating the New Rear Axle
There are several methods of locating the new rear axle. All will require some fabrication and welding.
I’m going to note at this point that it is possible to retain the torque tube and rear axle with a newer model transmission. It’s been done twice times that I know of. I don’t really recommend it as it’s just as much work, maybe more, as swapping the rear axle and torque tube with something more modern and available.
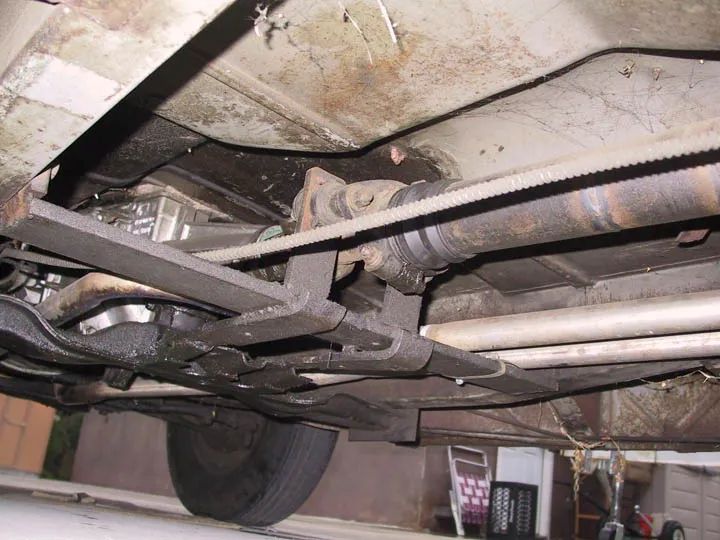
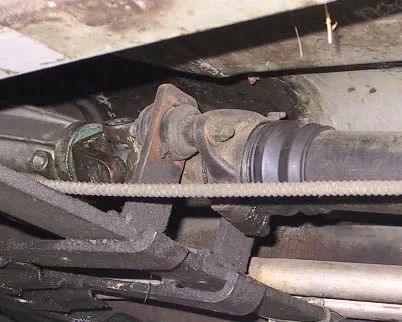
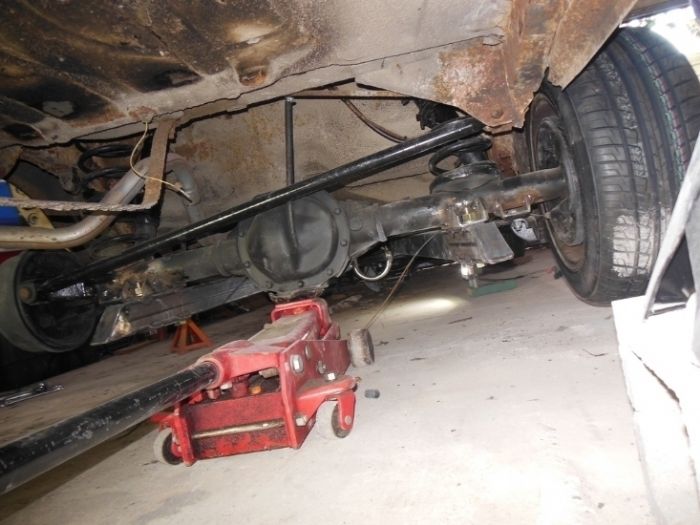
While not recommended, the first photo below is how the torque tube and original axle can be retained. The transmission yoke would still need to match the transmission, which might require modifying the driveshaft for a different yoke. This is in a 1955 Nash Statesman with a Ford 302 and a T-5 manual transmission. I don’t have any additional information. It looks like the driveshaft was extended. 1955 six cylinder models used a solid shaft, automatic equipped models (Nash sixes with Hydramatic and Packard V-8s with Ultramatic) used a tubular shaft (still inside the torque tube). Solid shafts used a center carrier bearing to prevent flexing inside the tube, tubular shafts didn’t need a carrier bearing. I have no idea which (solid or tubular) in this conversion, but the tubular shaft would be easier to lengthen. A fellow in New Zealand did something similar with a 63-64 Classic using a Toyota R154 five speed manual behind an AMC 232 six (home made adapter). Can’t find my photos of that one!
One commonly used method is leaf springs. The rear sills (“frame” rails) of the big cars are all stout enough to mount leaf springs. You will need to weld or bolt on a front spring hanger and something to locate the rear of the spring, either a slider or a shackle. Sliders weld/bolt on the bottom of the sill, shackles will require a hole drilled through the sill and a reinforcing tube welded in. On some Ramblers (63-66 specifically) the gas tank filler runs under the sill close to where the front spring hanger needs to be. It would be hard to relocate the filler tube. It would be a good idea to weld on a piece of angle iron or steel bar that the spring would hit before hitting the tube. I’ve seen that done. The length of the springs may be an issue also. On one installation I’ve seen Mustang II rear leafs were used. Those are about 50” long. AMC Hornet/Concord leafs are about 52” long and should fit, Javelin springs are 53”. Leaf springs probably take the least amount of fabrication and the hangers can be made to bolt on. The disadvantage is they don’t ride or handle quite as good as coil springs.
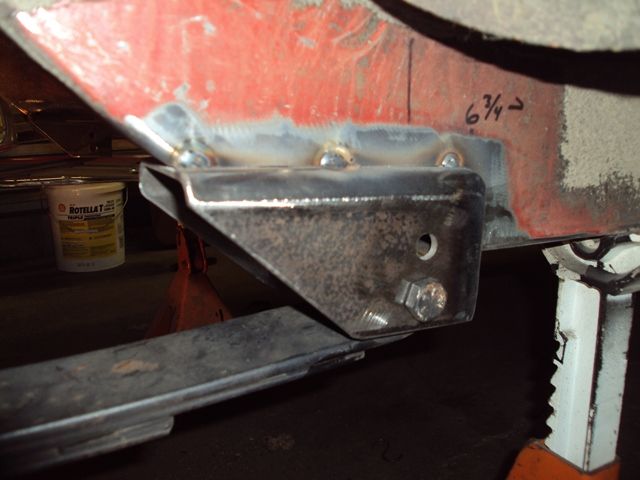
This installer decided to notch the sill for the front spring mount. A plate welded (or bolted through) on each side will work also. These are made from 3 1/2″ x 3/16″ square tubing.
The springs are Mopar A-Body (63-76 Dart/Scamp/Duster) rear leaf springs — 55″ long, 2-1/2″ wide. These look like six leaf heavy duty sedan/station wagon springs. Factory front bushing is used.
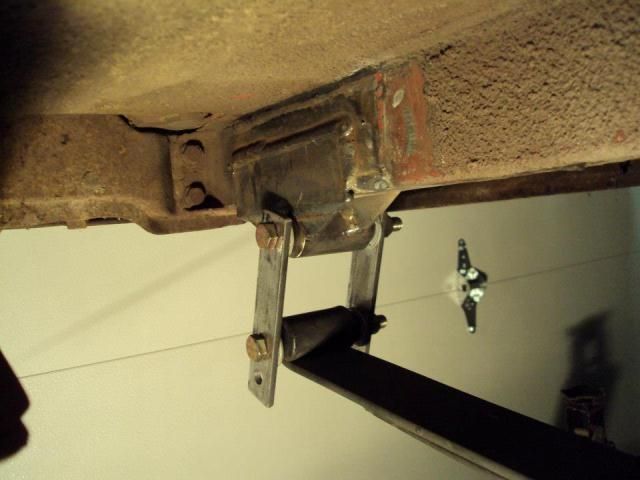
Rear mounts are made from 1-3/8 OD x 7/8″ ID DOM tubing welded to 3/16″ x 3 flat bar. Rear shackles are 1/4″ x 1-1/4 flat bar. Rear shackle bushings are Mopar A-Body (7/8″ OD x 1/2″ ID). Personally I would use sliders here, similar to these (below) from Speedway Motors. they can be found with ball bearings (like these) or nylon sliding blocks. Nylon would probably last longer on a street car and be easier to replace.


A Ranger 7.5″ rear axle was used. This installer elected to use the Ranger shock locations rather than keep the originals. Passenger side is in factory position, drivers side was re-located. Ford Ranger rear shocks. The upper shock mount bar is 1 1/2″ x 1/8″ square tubing. Spring perches were removed and re-located to the bottom of axle tube (not that some Ranger axles have the perches on the bottom – my guess is 2WD models have them on the bottom, 4×4 on the top for extra clearance). Pinion angle is 3 degrees to follow the 3 degree angle of the Ranger. A Ford 302 with AOD transmission is used in this 64 Classic swap.
It’s pretty easy to retain the stock coil springs. The spring seat is simply bolted to the top of the axle. So take the originals off the existing axle, locate them in the right place, then drill a hole in the new axle tube for the 3/8” fine thread bolt that holds the seat to the axle. There is very little stress on the bolt, the weight of the car holds everything in place. All the bolt really does is prevent the spring seat from moving on the axle. The stock Panhard rod and shock mounts can often be used – just drill out the rivets holding the strut rods on.
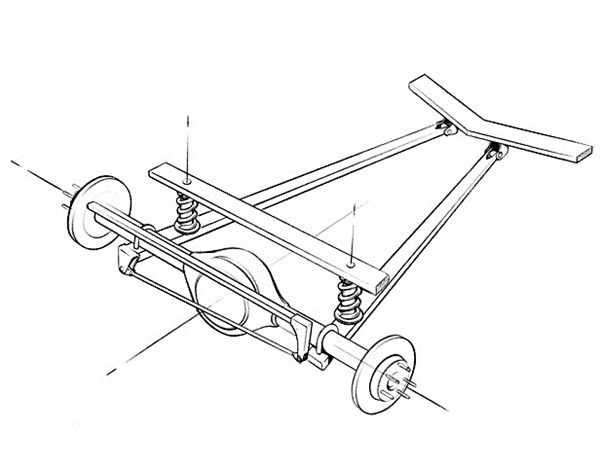
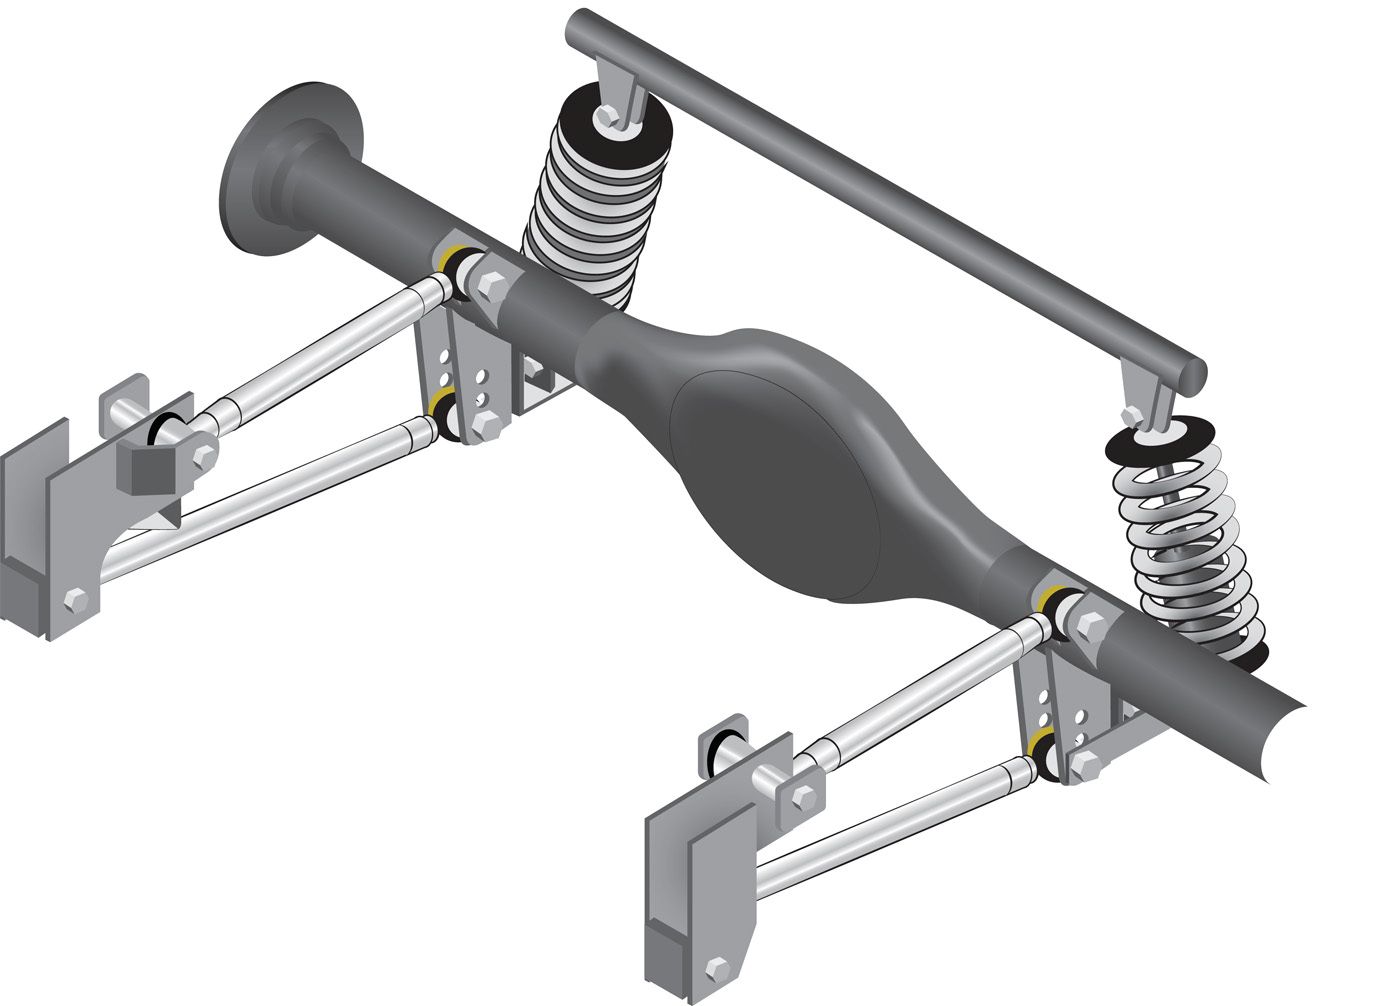
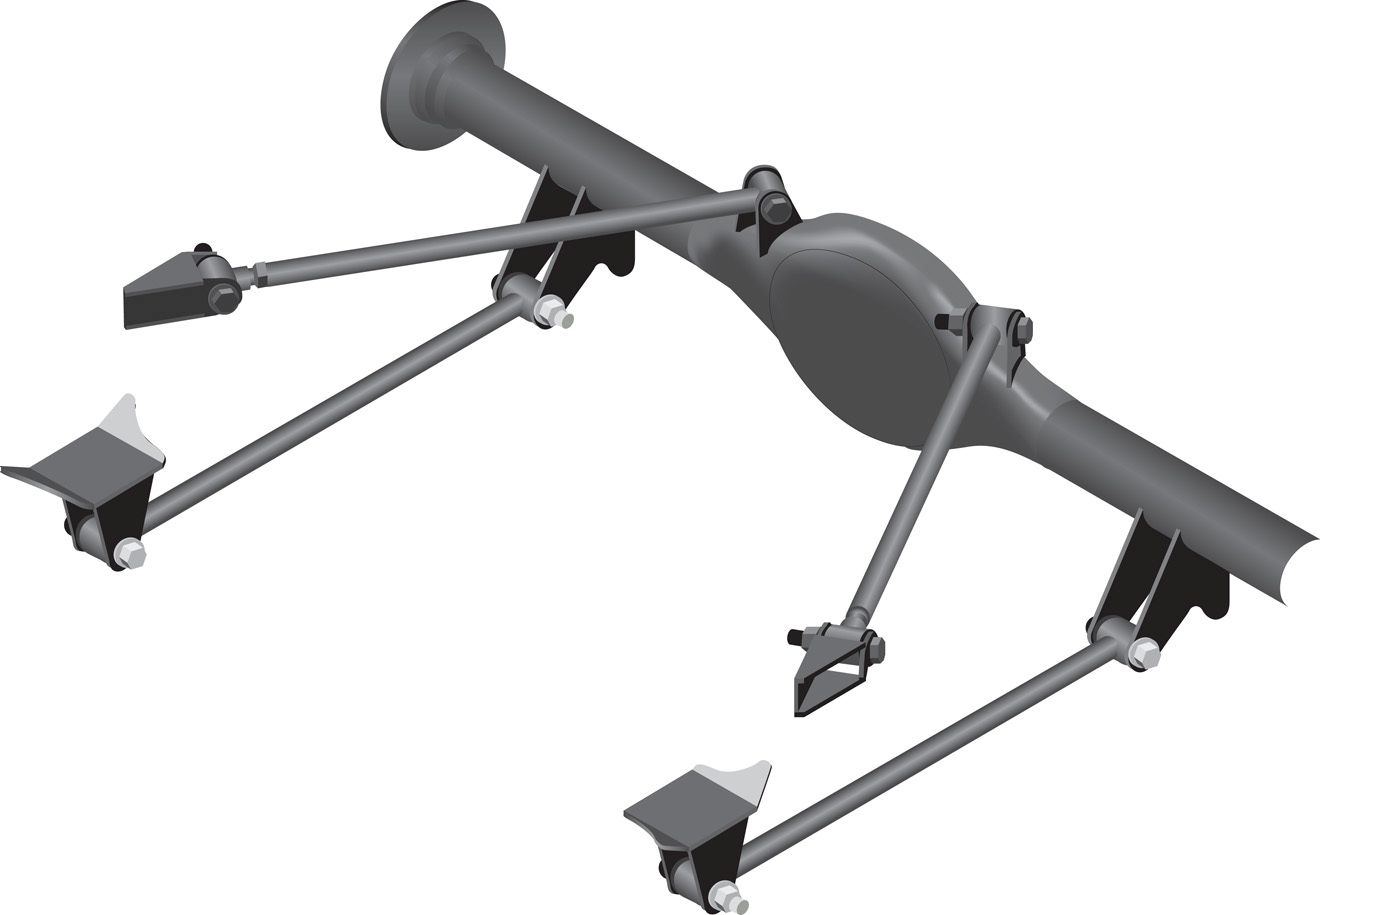
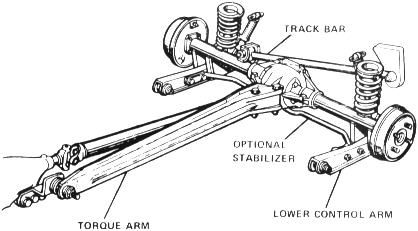
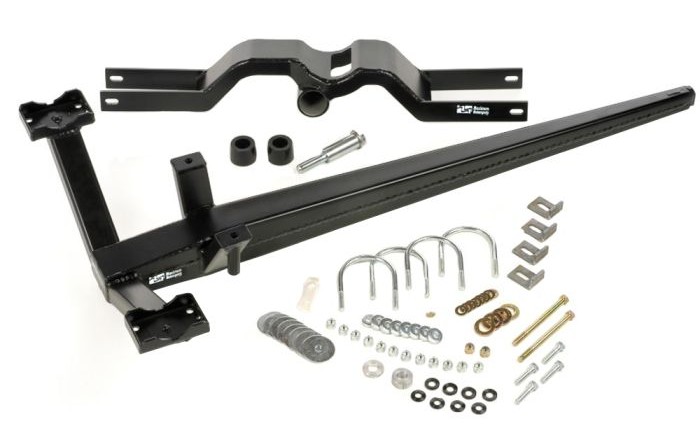
The second most common method is “truck arms”. The name comes from how GM located the rear axle in their 60-72 trucks. These are two long trailing arms rigidly attached to the axle and pivoting near the rear of the transmission. It’s very similar to ladder bars (another option), but typically much longer. The longer the ladder bar/truck arm the smoother the ride. The suspension is so durable and relatively light that NASCAR used it from the mid 60s through 2021 (2022+ cars have independent rear suspension). The main fabrication is the arms themselves and a front crossmember to mount them to. There are no kits for Ramblers specifically, but the Hot Rods to Hell (www.hotrodstohell.net) G-body kit is easily adapted, or their Buick torque tube eliminator kit (not listed on site – call and ask!). You can buy individual parts (like the arms) from them also, just go to their catalog and scroll down to CenterDrive Components. Many factory types mount the springs on the arms in front of the axle, but some (like the GM G-body) mount the springs on the axle tubes just like the stock Rambler coils. Below is a general diagram of “truck arm” suspension.
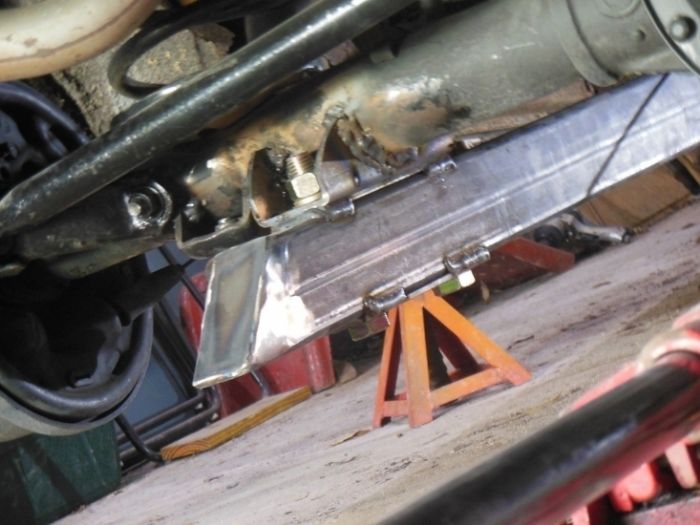
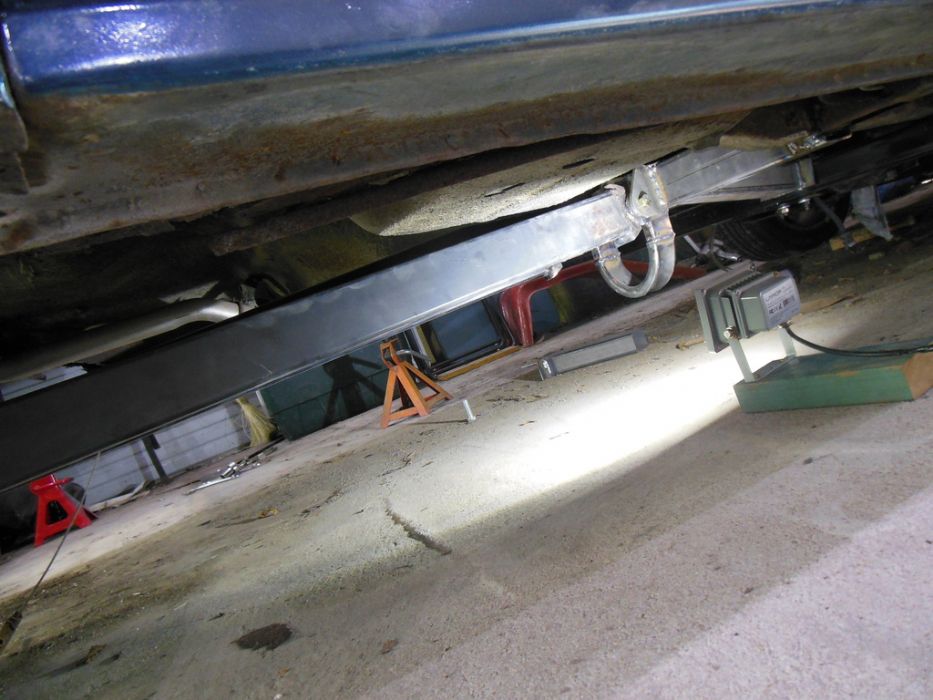
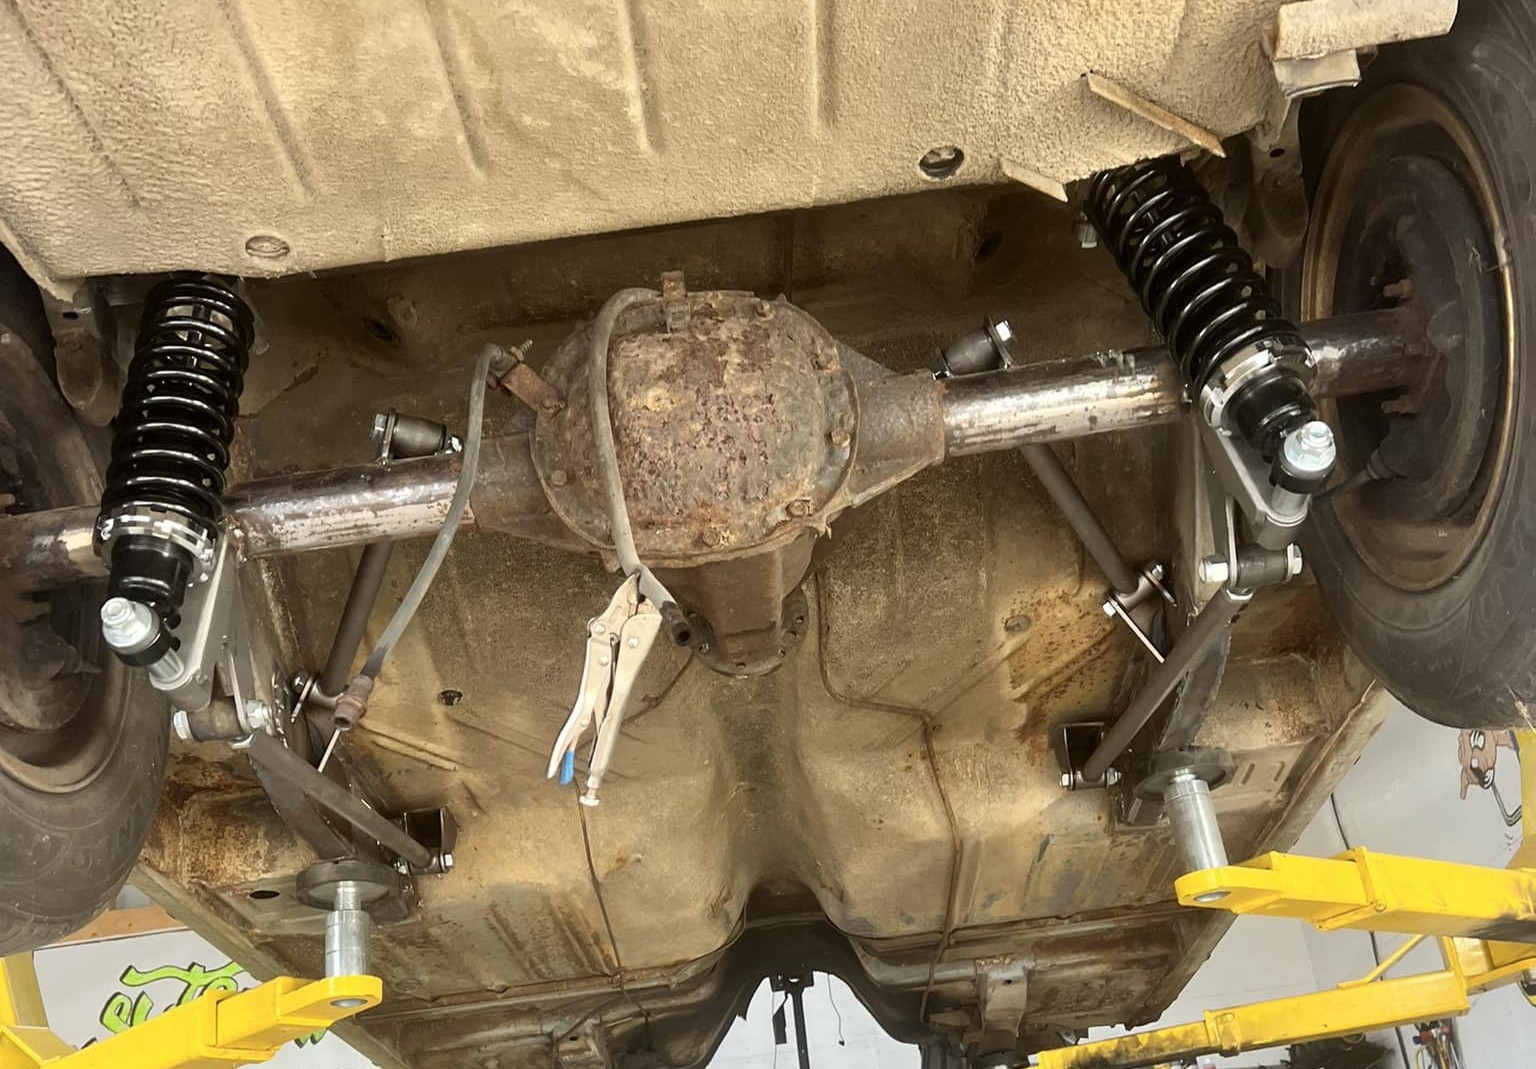
Fabricated truck arms with a Ford 8.8″ in a 1960 Rambler Six station wagon with a 1995 Dodge Dakota V-6 and manual five speed transmission. Plates on the 1.5″x2.0″ 11 gauge rectangular steel tubing arms bolt to the leaf spring perches of the 8.8″, which were moved from the top of the axle tubes to the bottom.
The stock Rambler Panhard rod was retained as well as the original spring seats. You can see that the arms angle in.
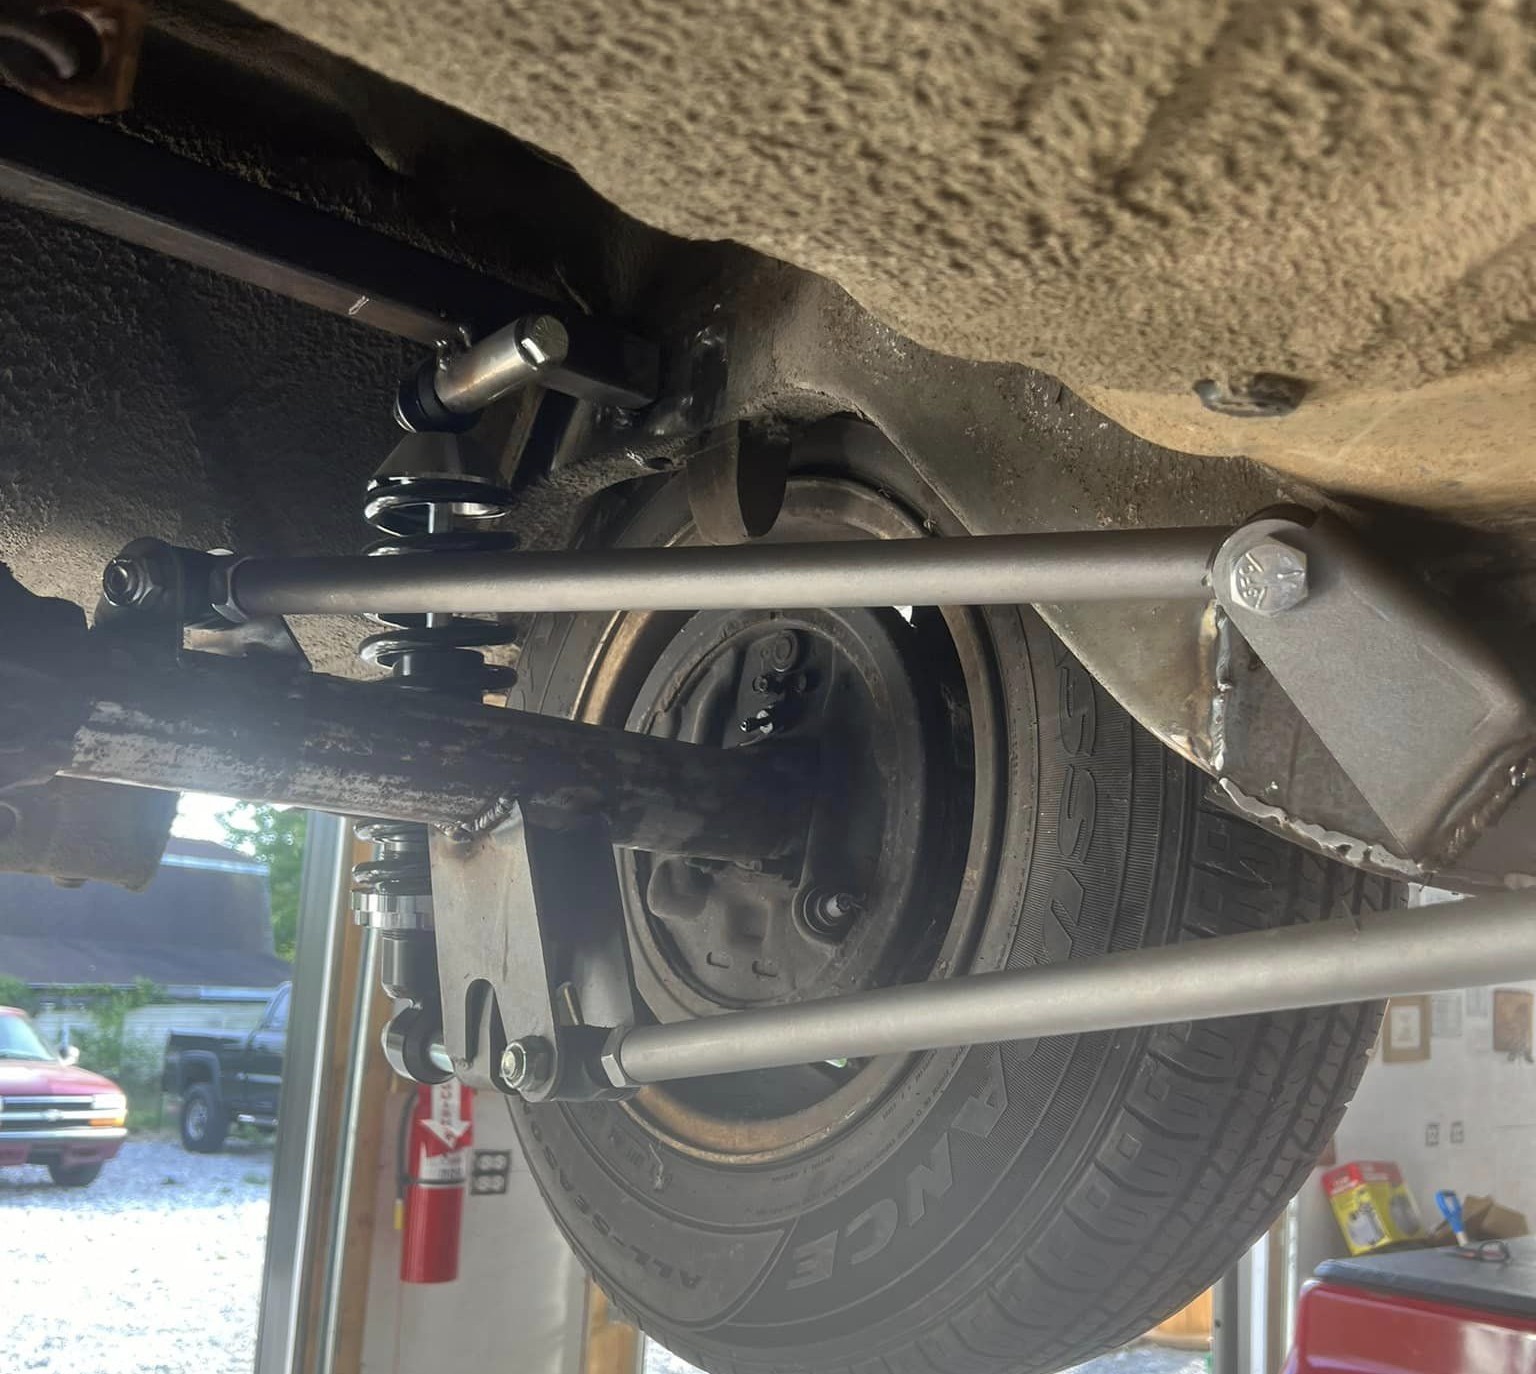
Unfortunately I don’t have a great photo of the front crossmember. The loop for driveshaft clearance also holds the inner ends of the 1.5″x2.0″ 11 gauge rectangular steel tubing crossmember. The crossmember is welded to the front sills.
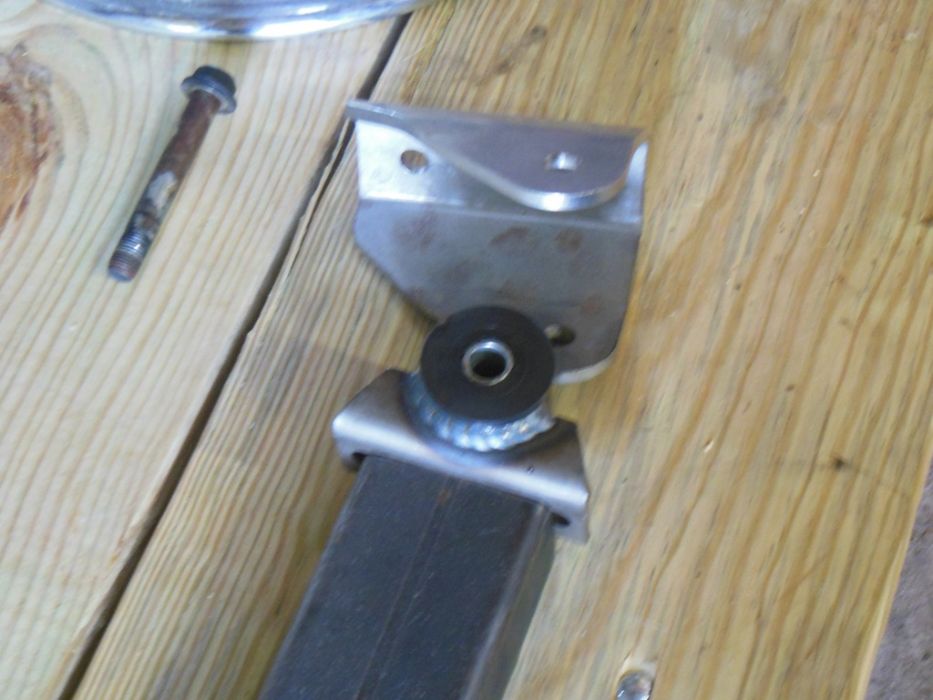
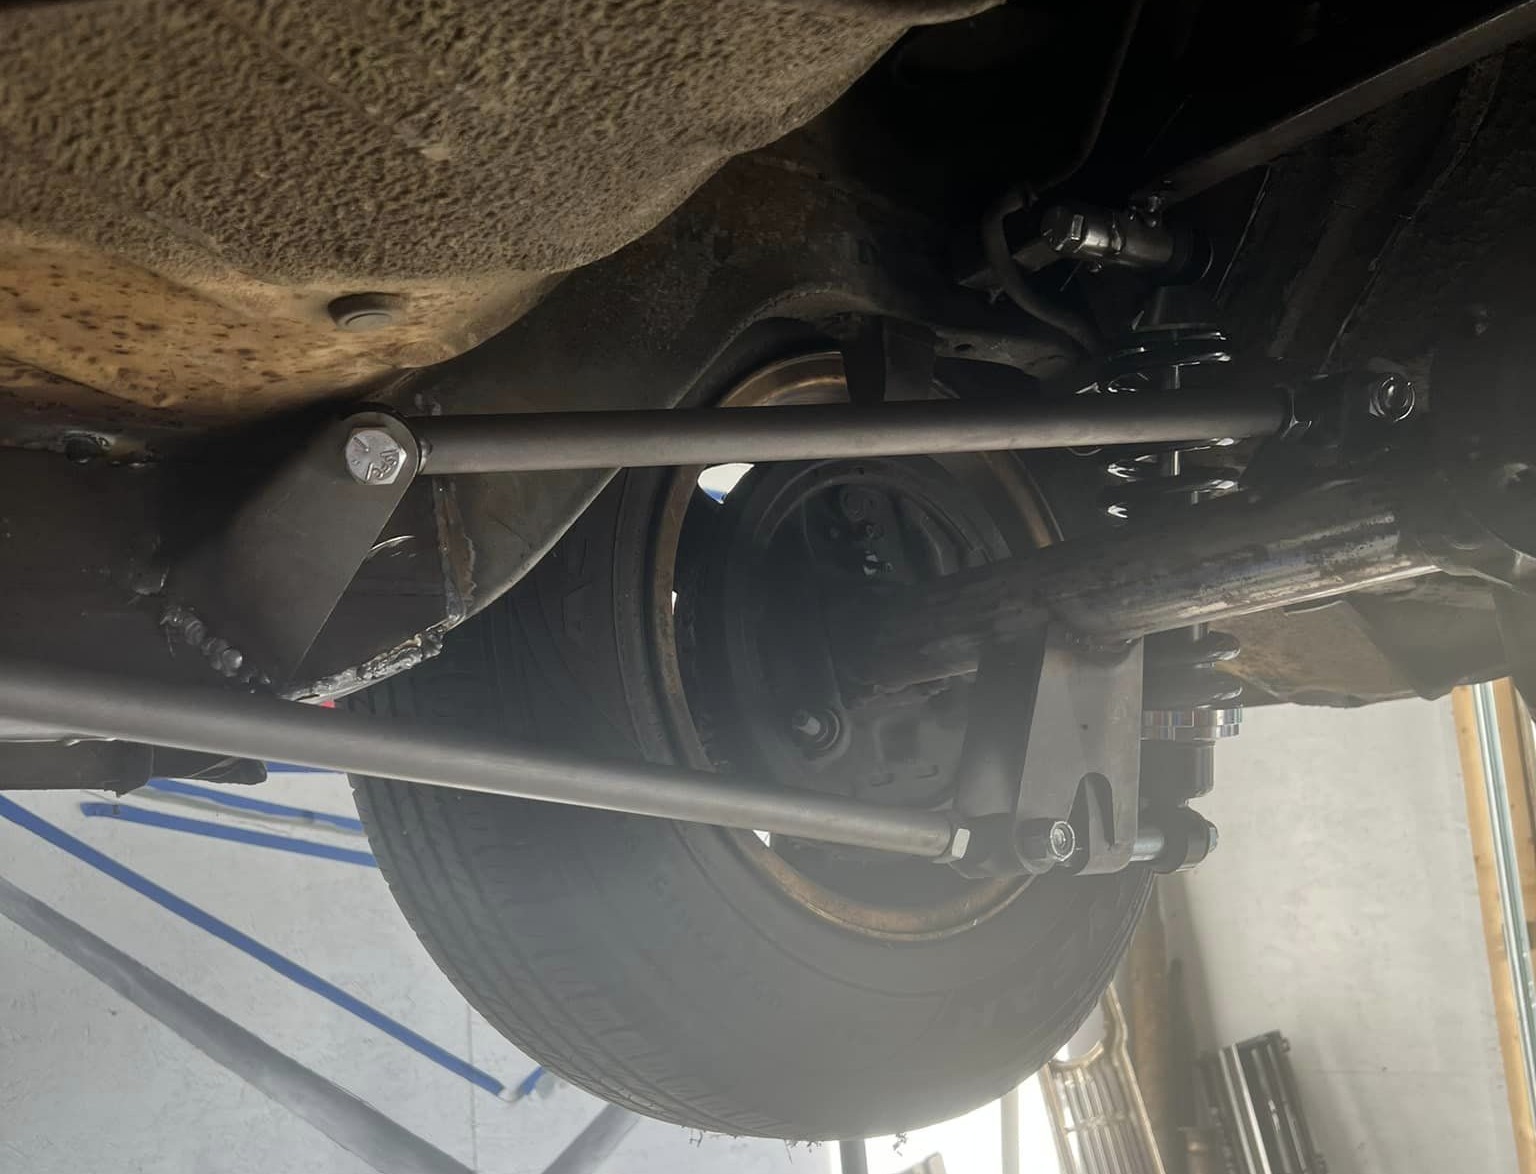
Close-up of the front of the bars. That’s just a generic inner control arm bushing, not sure what it was originally for. The car has been on the road a few years and reportedly drives and handles great.
I mentioned ladder bars, but I don’t recommend them. I ran 30” ladder bars the first time I swapped the rear axle in my 63 Classic. The ride sucked! It bounced a lot over rough roads. The longer the bars the better the ride. Okay for drag racing, but I wouldn’t run under a 48” bar – basically a truck arm. Comments on The AMC Forum in the “rear end swap 56-66 Classic” topic are all negative about ladder bars on a street car — to the point I’m not even going to go over it further. See https://theamcforum.com/FORUM/rear-end-swap-5666-classic_topic11214.html, page 5 for photos of member “59ramblersuper6” ladder bars. From there through page 7 or so for discussion on possible issues, bottom of page 14 where he broke some welds, experienced vibration, and ditching it for truck arms.
There are many universal four link kits out there that are perfectly acceptable. They range in price from around $200 and up. There are two basic types – parallel bars and triangulated bars. Parallel uses four main bars but require a fifth bar, a Panhard rod, to control side to side movement. Some will use an angled bar between one side of the lower rear axle mount and the other side lower front mount to control side to side movement. Triangulated uses two long lower bars and two shorter upper bars mounted angling in from the axle (wide on the axle) toward the center of the car on the mounting crossmember. Most production cars use the triangulated type. All these require welding mounts to the axle and to the body.
Parallel four links are typically reserved for race cars, but can be used on the street. The front bar mounts are typically on a crossmember. Instead of the rear coil over shocks spring seats can be mounted on top of the axle tubes for coil springs. Not shown is the necessary Panhard rod or angled rod between lower rear bar end on one side, lower front on the other, forming a diagonal brace against side to side movement.
The typical triangulated four link kit is a bit easier to install since no crossmembers are typically needed (but are used in some applications). No Panhard rod is needed since the angled upper bars control side to side movement.
This is a generic triangulated four link kit installed in a 63 Classic using an S-10 axle. I don’t know who manufactured the kit. Obviously coil over shocks are being used, but the original spring seats can be attached to the axle and original coil springs and upper shock mounts used. That would save the work of welding in a crossmember for the coil overs.
Left and right side views showing how upper link mounts are attached. I don’t have a good view of the upper link mounts. The upper crossmember can easily be seen here.
The 1967-78 AMC big car suspension can be used. The upper arm crossmember is about 1-1/2” wider than the distance between the 63-66 big car sills. It would be easy to shorten the crossmember by ¾” on each end then weld mounts to the older car body. The stock lower arms would require welding mounts in. Deeper wheels would be needed to compensate to the ~1-1/2” wider axle. The axle tubes can be cut and welded, but you’ll have to check and see how deep the splines on the axles are first. It should be easy to tell how far they have been in the differential gears. From there measure how much deeper the splines are/the axle could be pushed in the side gears. If the splines are deep enough the axles can simply be cut off and pushed in deeper. Remember, no torch! Use a cut-off wheel or hack saw on the axle, a torch would ruin the hardening.
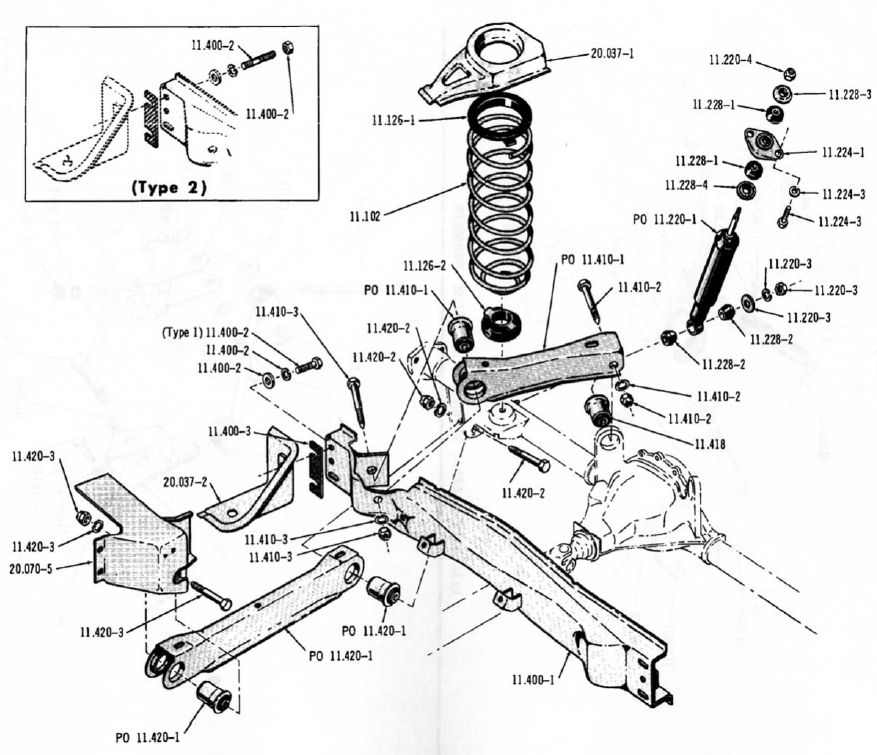
1967-78 Rebel/Matador/Ambassador/Pacer rear suspension. Simply cut 3/4″ off each end of crossmember 11.400-1 and weld mounts to the inside of the rails of a 63-66 big car. Deeper wheels would be needed to compensate for the 1-1/2″ wider axle, or narrow the axle.
Another type of rear suspension that could be used is the three link. The two lower arms are identical to the triangulated four link. Instead of two angled upper arms there is just a single arm near the top center of the axle. The problem here is there is seldom room for the upper link even if it’s offset to one side instead of dead center above the axle.
A variation of the three link that would work well to replace a torque tube is the torque arm. This replaces the upper center link with an arm that bolts onto the axle near the lower center, under or right beside the driveshaft. This is very similar in geometry to the torque tube. There are a few made to bolt to the popular Ford 8.8″ rear axle. The kits are around $750 (April 2026) from Maximum Motorsports. There are other makers, but all cost more. The lower cost 1982-2002 F-body arms can be used, but you would have to devise a way to attach it to the axle or use an F-body axle. The 75-80 Chevy Monza also used a torque arm rear suspension. All the GM torque arm suspensions used a specific differential casting with bosses to mount the arms. I have seen brackets that bolt on using the rear cover bolts — they sandwich between the rear cover and differential housing and have tabs to mount a custom made torque arm.
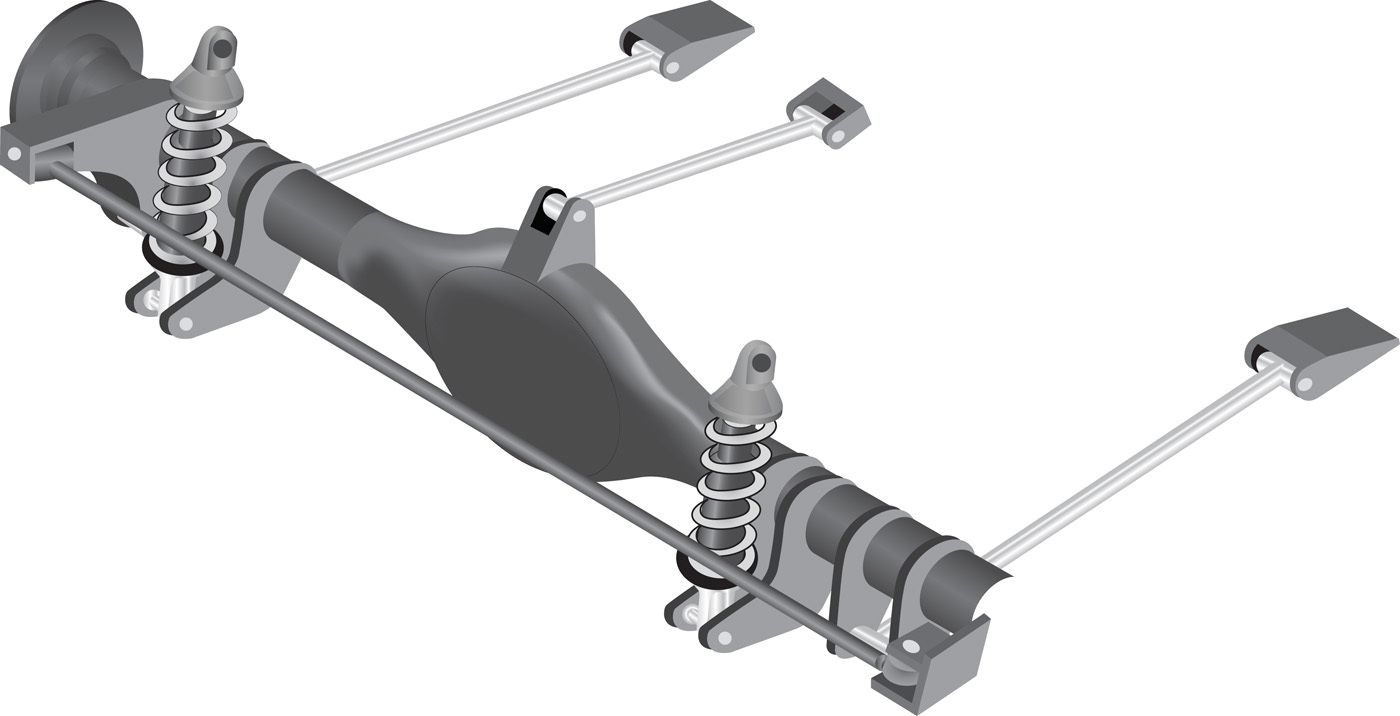
GM H-body torque arm rear suspension. Later F-body is similar.
The Maximum Motorsports Ford 8.8″ torque arm bolts to common 86-04 Mustang rear axles. It can be easily modified for the Ranger and Explorer axles. The crossmember was designed to mount on Mustang subframe connectors and would need to be modified for a Rambler, or a new one made. The front just slides into a bushing, there is no connector. The lower arms keep the torque arm from pulling out of the bushing.