This information has been “borrowed” from https://www.fordmuscleforums.com/threads/tricky-or-trick-hei-module-inside-duraspark-case.492810/. Edited by Frank Swygert, 02-15-2026
Both the Duraspark system and the GM HEI have been around since the ’70s. The stock Duraspark is by most accounts a rugged and reliable system, but unfortunately the originals are aging and let’s face it, the parts store replacements are less than reliable.
One popular and cheap ignition option for Ford enthusiasts is using a GM 4-pin HEI ignition module to trigger the coil. It is all done while retaining the Duraspark distributor and using any number of aftermarket coils. Many use the 80’s Ford TFI coils, which have more energy than the standard type Ford coils. The HEI runs off of 12 volts, and when using an aftermarket or TFI coil there is no ballast-resistor needed. If using in a 1970s AMC with resistance wire you must either remove the resistance wired (buried in the harness…) or use another switched 12V power source. Users of this setup tell tales of a stronger spark, better starting, and smoother idle. The big plus is that the four pin HEI module costs $20-40 and a spare can sit in your glove box, and parts stores still carry them.
An old Duraspark case can be gutted and used that as a mount and heat-sink for the HEI module. It keeps a clean, stock-looking appearance while improving your ignition. You’re looking for an aluminum box that bolts in place of the Duraspark and serves as a protective cover and heat sink for the HEI module. A crappy parts store replacement that has already failed will be ideal. You can, however, use any aluminum (or even steel) box. The HEI module REQUIRES a heat sink of some type — even bolted to the steel inner fender panel will be fine, but doesn’t protect the module from dirt and water.
In order to “gut” the internals of the box, you need to bake the box. Yes, just cook it in the oven. The circuit board is entirely surrounded by a potting compound that is poured into the box where it dries around the board. This forms both a moisture-proof and impact resistant mold around the electronics. This is what you see on the back of the box– that rubbery-feeling stuff. In its dry form it is nothing short of a bitch to get out of there, but once you bake it (350F for about 20-25 minutes) it comes loose from the aluminum case and you can pry it right out. I used aluminum foil both under and on top just to be safe in case anything got too gooey. It didn’t even stink up the kitchen. Might want to do this when the wife isn’t around …
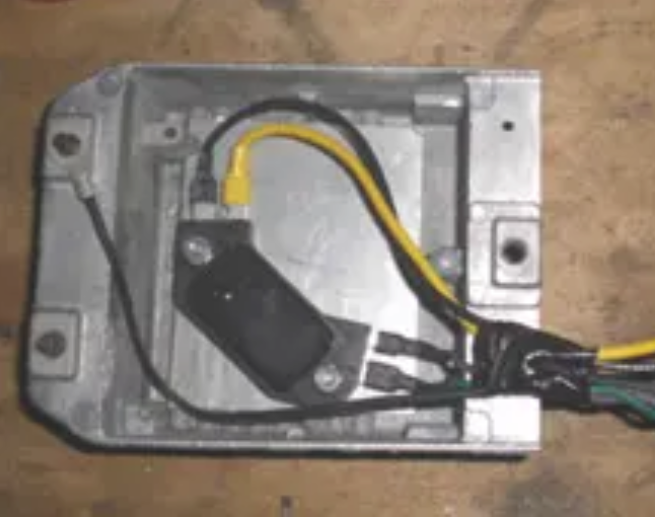
Once that is done, all you need to do is mark placement of the HEI module in the box and figure out where to drill mounting holes. I took the easy way out and drilled all the way through, using 6-32 machine screws and nuts. I also cut up a flat piece of aluminum I had in the shop to use as the actual heat sink to go between the module and the finned surface of the case, but if it mounts flat on the inside of the case the extra piece of aluminum isn’t necessary. As noted earlier, you must have some sort of heat sink to mount the HEI module to as it gets very hot. You also have to use a quality heat sink compound/paste between the HEI module and heat sink surface to aid in heat transfer.
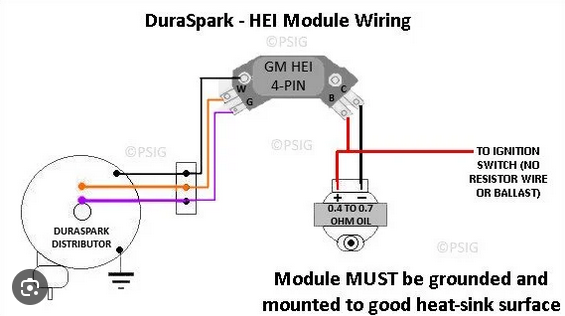
Wiring the HEI to the distributor and coil is pretty straight forward. The HEI module has four pins, B&C on one end, W&G on the other. Pins B, C, and W are .25” blade style while G is .187” blade…so shop accordingly for terminals. There are only five wires involved. Two to the coil (one is ignition source), and three to the distributor. You’ll need a 12 volt ignition start/run source that actually puts out 12 volts, i.e. doesn’t go through the ballast-resistor or resistance wire. Another wire you may want to hook up from the car is the tach wire (if you have one). Just connect to the coil as normal.