
1963 Rambler Station Wagon Rear Side Window R&R
by Tom Jennings, edited by Frank Swygert 01-26-2026
Frank: Tom used this method on his 64 Classic wagon in 2002. All Rambler/AMC station wagons use similar rubber, so this method should work for all.
To replace a rear quarter panel after some idiot in a pickup truck with bad brakes (“but I was pumping them” he sez) crunches it, you gotta take out the scary side window. It’s scary because it has been sitting there for 40 years and rubber turns to something resembling coal.
The Technical Service Manual (TSM) says something to the effect, just pry down the window channel lip on the inside and tilt the window out. Uh-huh. That might have been possible in 1964 with new rubber, but not in 2002 or later. It’s circumference is about ten feet total and each of my fingers covers about an inch.
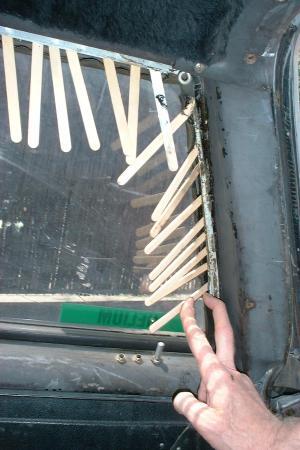
But there is an easy trick: go buy a bag of popsicle sticks, aka craft sticks. Pry down the rubber lip, insert a stick, a rubber mallet helps.
Sometimes the stick will catch on a small lip caused by the inner/outer sheet steel assemblies (easier to grok when you have the window out). This is where the mallet comes in.
A photo speaks a thousand words. After inserting enough sticks to go 3/4ths of the way around (leaving the bottom in place) it really did just tilt out. Don’t drop it!
Re-insertion is a true terror on an old car. I’m sure with a new rubber it would have been straightforward, but as far as I know, there are no new ones available, and my experience with 40 year old NOS rubber is very, very poor. I simply don’t bother any more.
The TSM recommended trick is to insert a thin rope into the groove, press the window in place after lubing the *outside* edge with sealer, press in and pull the rope vertically, pulling the rubber lip over the steel flange. What it does to old rubber is tear it, like the pull-string on a carton of oatmeal.
I have no real trick, basically I used a LARGE rope (almost 3/8″ diameter) with the idea it will be less likely to cut through the old rubber like cheese. It helped, but basically I had to fight it and use a screwdriver to pry individual little bits of rubber at a time over the flange. Took about an hour of heavy-duty swearing.
It was one of those events that reminded me just how old, really old, this car is.
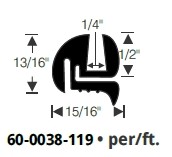
Frank: Tom’s correct, there isn’t a new gasket made in one piece, but there is gasket material of the correct profile in straight lengths. This rubber from Steele Rubber Products (photo below) appears to be the correct profile for the gasket with chrome strip, but check dimensions. They also have some universal locking strip rubbers (with black or chrome faced locking strip) that will work — see their universal catalog.
I used something like this back in 2002 when I was building my 63 Classic wagon. It has to be cut in four separate pieces. Cut the pieces about 1/8″ longer than they need to be. The gasket material will compress a little when installing. Use a little black RTV or weatherstrip adhesive in the corners. Remember to put a little sealer in the glass channel and on the metal where the seal will rest against the body flange. Just put the lower lip over the flange then use a string in the seal behind the lip around the sides and top rubber. Push in lightly on the glass as the string is pulled. Takes two people, one on outside holding/pushing glass, one on inside pulling strings. Run the string over the top then down each side. Pull both sides at the same time, don’t try to do one then the other! Some sealer will get on the lip as you pull the string through and the lip over the sealer. Clean with mineral spirits, alcohol, or paint thinner on a rag. It helps to mask off the metal inside just below where the rubber lip will sit with painter’s tape all the way around. I used 2″ wide tape only, but 12″ wide paper would have been nice.
Deprecated: File Theme without comments.php is deprecated since version 3.0.0 with no alternative available. Please include a comments.php template in your theme. in /home3/amcmagc1/public_html/wp-includes/functions.php on line 6114
Leave a Reply